EPIC - How To Install
TL;DR
- In Eclipse select menu item Help > Install New Software...
- Enter the update site https://www.epic-ide.org/updates/testing in the Work with... text box and click Add... next to it.
- Enter a label such as EPIC updates testing in the popup and click Add to close it.
- The EPIC Main Components item should now appear. Tick the checkbox next to it and click Next >.
- Follow the on-screen instructions.
- After installation: go to Preferences > General > Editors > File Associations, and for file types *.pl and *.pm choose Epic Perl Editor (rather than the pre-set Generic Code Editor) as Default
Long version
Before installing EPIC you need Eclipse, Java, and Perl on your system. An optional PadWalker module is needed for debugging. For details read the system requirements section of the FAQ.
The installation and upgrades are best performed using the Eclipse Update Manager. The Update Manager connects to the EPIC update site, downloads the necessary files and stores them in the plugins and features subfolders of your Eclipse home directory. An older version of the update site can also be downloaded from the EPIC project page at SourceForge and stored locally for offline installation.
The following description applies to Eclipse 3.6 and newer. Older versions have a slightly different looking Update Manager dialog.
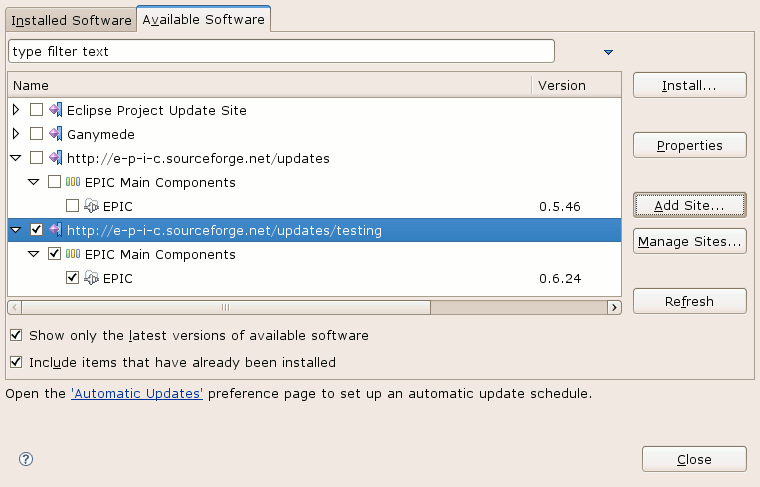
After starting Eclipse select Help > Install New Software... from the menu. Click the Add... button and enter:
- https://www.epic-ide.org/updates for the stable 0.6.x, older version of EPIC
- https://www.epic-ide.org/updates/testing for the most recent 0.7.x version
Alternatively, if you have downloaded and unpacked the update site manually, click on Local... in the Add Site... dialog and point to the update site folder.
Tick the newly created site and press the Install... button. Follow the instructions of the install wizard. The warning about the installation of an unsigned feature can be ignored. After installation Eclipse has to be restarted.
Note: more recent versions of Eclipse ship with a generic code editor, which is by default associated with the Perl file extensions and takes precedence over EPIC. In order to use the EPIC editor, you need to set it up as preferred. This can be done in Preferences > General > Editors > File Associations. For file extensions *.pl and *.pm select Epic Perl Editor and click on Default. You will recognize that the correct Perl editor is used by the camel icon appearing in the editor tabs.
Now the installation of EPIC should be complete. For further information, read the EPIC User's Guide in Eclipse's online help or download it as a printable PDF file.